Monday, May 31, 2010

Advanced Plan Pizza- What?!?


What?!?

I know. When I found this recipe (at a website called "Tropical Traditions"), I was extremely skeptical. The second time I tested the recipe, I made two batches, because I knew we would snack the first one away (as we did the original test) before a whole pizza could be made. Honestly, we love this recipe as a kind of a cheese bread and as a pizza crust.
Enjoy.

Ingredients:
2 cups whole milk organic (raw is preferable) mozzarella cheese, shredded
2 large organic eggs
2 tablespoons flax meal
2 tablespoons organic coconut flour
1/2 teaspoon aluminum free baking powder

Preparation:
Preheat oven to 350 degrees F. Cut 2 pieces of parchment paper to line two baking sheets.

Mix cheese, eggs, flax meal, coconut flour, and baking powder together until a sticky wet dough is formed. Spread with a spatula to 1/4 inch thickness on a baking sheet lined with one piece of parchment paper. I usually cover it with another piece of parchment, once I have it shaped into a circle, and roll it out with a rolling pin a bit more, because it will "rise" a little while cooking, and I want it to cover as much surface area as possible, and remain thin like a pizza crust.

Bake for 30 minutes in preheated oven. Halfway through the baking process, flip crust over by lifting it from the baking sheet, flipping it over onto the second parchment lined baking sheet and peeling the old paper off. This is easier than it sounds. Return to oven to finish baking for the remaining 15 minutes.


Remove from oven, and flip over again (onto a cooling rack) for cooling. Once crust is cooled, top with Maximized toppings (we used some cold diced organic chicken and tiny broccoli florets) and, yes, more cheese. (I have also used home made bruschetta topped with the cheese, and it was wonderful.)

Place crust with toppings under the broiler, about 4 to 6 inches from heating element, on high heat, for a minute or two until cheese is melted and bubbly. I do this on yet another piece of parchment paper, but watch it carefully because the broiler will burn the parchment paper if you leave it too long. My parchment paper has been brown, but not burnt, by the time I remove the pizza from under the broiler.


Makes 2-4 servings. (I suggest you make two.)

Thursday, May 27, 2010

Organic Strawberries, Maximized Shortcake

This morning I whipped up a batch of the Basic Almond Muffin recipe in GOOD FOOD. I added some lemon zest and substituted lemon juice for the water called for in the recipe. I like to mix things up and experiment, and these two changes turned out to be a good idea, although the original recipe is lovely just the way it is. (By the way, if you are an inexperienced baker, remember that baking is chemistry. You can't change amounts of ingredients or skip ingredients the way you can in cooking, which in many ways is a more creative venture.)

Anyway, later in the day I ran across some organic strawberries.

You know the rest. Whip up some organic cream, gently sweetened with a tiny bit of stevia and a whisper of vanilla extract. Slice a muffin in half, add berries and whipped cream and top with mint fresh from my garden. (The only reason I planted mint this year was to decorate desserts.) We couldn't wait for our meal to be over: Dessert Heaven.

Enjoy.

Middle Eastern Spice Mix Recipe


How to make a Middle Eastern Spice Mix

There are many different spice blends in the Middle East varying from country to region.

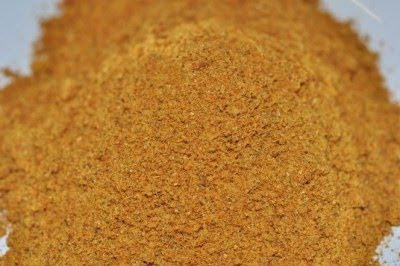
This Middle Eastern spice mix recipe has been specially blended by Chef Jeena.

As with Indian spices, Middle Eastern spice blends have a variation of some select spices such as cumin, coriander, turmeric, sumac, mint, thyme, nutmeg, pomegranate, cinnamon and many more.

Middle Eastern cuisine uses garlic, olive oil and lemons just as the Mediterranean.

This delicious and aromatic spice blend is very easy to make, there is no roasting of the spices.

Chefs Middle Eastern spice blend recipe can be used to sprinkle on food, marinate meats and more.


Spice ingredients


1 + 1/2 tsp Cumin
1 tsp Coriander
1/2 tsp Sumac
1/4 tsp Dried mint
1/2 tsp Dried thyme
1/4 tsp Dried pomegranate seeds
1/2 tsp Cinnamon
1/4 tsp Nutmeg
2 tsp Paprika
1 tsp Salt
1 tsp Light brown sugar
1/2 tsp Turmeric
Pinch black pepper


Picture of Chefs spice blend mixed with lemon, olive oil and garlic.


How to make Middle Eastern spice mix/blend


Take all of the spices listed on the ingredients and place into a coffee grinder or spice grinder.

Pulse for 1-2 minutes until the pommegranate seeds become powder.


Keep in a sealed container until used.


For a delicious marinade mix Chefs Middle Eastern spice mix with olive oil, garlic paste and fresh lemon juice.


Friday, May 21, 2010

Liver pate - Lifrarkæfa

I love liver pate, but I have never tried to make it, probably because you can get perfectly good liver pate in most supermarkets in Iceland. This sounds like a good recipe:

700 g liver
300 ml milk
2 cooked potatoes
1 tbs chopped, browned onion
3 eggs
100 g butter or 300 g fatty bacon
7 tbs flour
salt and pepper
dash of cardamom
1 fillet of spice-pickled herring (or about 10 anchovy fillets)

Soak the liver in cold water for about 30 minutes. Remove the membranes and blood vessels. Chop coarsely and put through a grinder 4 times, with the herring/anchovies, onion, and bacon (if using). Add the potatoes for the last round of grinding.

If you're using a food processor, dump everything above in at once and process into a smooth paste, using the chopping blades.

Mix together the flour and spices and mix into the liver paste along with the cooled melted butter (if using). Add the eggs and mix well. Finally stir in the milk, little by little.

Grease a pate mould and press the raw pate into it. Cover with a cheesecloth and cook in a water-bath(*) for about 1 hour.

May be served hot or cold. A classic delicious Danish smørrebrødrecipe calls for dark rye bread with warm liver pate, bacon and mushrooms.

I like liver pate best smeared on Danish rye bread and topped with pickled red beets. The first time I brought such a sandwich with me to school for my mid-morning snack, the other kids thought the sandwich filling was raw meat!
-----------

(*) Water-bath: Heat an oven to medium temperature (about 180°C). Bring to the boil enough water to cover the bottom of an oven-proof pan (e.g. a jelly roll pan). Put the pate mould into the pan, pour the boiling water into the pan and put immediately in the oven to cook.

Saturday, May 15, 2010

Coconut Flour Crepes


These crepes are surprisingly delicious. They can be used for breakfast or brunch, and would be the beginning of a lovely dessert. To that end, I would suggest rolling fresh, local, blueberries, raspberries, or strawberries into the crepes, and topping them with a dollop of organic, stevia sweetened, cinnamon whipped cream. If you are using them for breakfast, I would top them with the Strawberry Sauce recipe which you can find in GOOD FOOD.

I also did a chocolate version of this recipe. I simply added 2 tablespoons of organic unsweetened cocoa powder, and substituted unsweetened chocolate almond milk for the milk in the original recipe. I also had to bump up the stevia to counter the bitterness of the cocoa powder. (Frankly, I preferred the original recipe, but I know there are lots of chocolate lovers out there.)

I tested the crepes in two types of pan. I used an old, very well seasoned, cast-iron pan, and I used a new Earth Chef pan that I recommended in GOOD FOOD. Both worked beautifully.

Enjoy.


Ingredients:
2 eggs
2 tablespoons coconut oil, melted
Stevia liquid drops, to taste (I use about 10 drops)
1/4 teaspoon pure vanilla extract - NO sugar, check the label (can substitute almond extract)
1/8 teaspoon salt
2 tablespoons organic coconut flour, sifted
small pinch of nutmeg
pinch of cinnamon
1/3 cup organic whole milk or unsweetened vanilla almond milk


Preparation:
In a medium bowl with a wire whisk, beat together the eggs, oil, stevia, vanilla, and salt. Mix in sifted coconut flour, nutmeg and cinnamon; stir in milk.
Heat an 8-inch skillet over medium heat. When hot, melt a tiny bit of coconut oil in the pan.

Pour 1/8 cup (two tablespoons-full) of batter in the skillet and swirl around in pan until a thin layer of batter covers the bottom. The crepe should be about 6-inches in diameter. (If you don't want them paper thin, govern your swirling accordingly.)

Cook 1-2 minutes, or until batter is bubbly and cooked around the edges. Flip the crepe and cook the other side for 1-2 minutes more, or until done.

These should be kept in the refrigerator if you want to use them for a dessert later in the day, but I would separate them with layers of parchment paper, and remove them from the fridge about an hour before dinner.

Friday, May 14, 2010

Stuffed leg of lamb

This is a rather good Sunday dish. If you don't know how to de-bone a leg of lamb, either buy it de-boned or get your butcher to de-bone it for you.

1 leg of lamb (about 2 kg. before boning)
50 g prunes, stoneless
30 g dried apples
2 tsp. salt
3/4 tsp. pepper

Soak the apple slices to soften. Rub half of the salt and pepper on the inside of the leg of lamb and stuff with the prunes and apple slices. Sew closed. Rub the remaining salt and pepper on the outside of the meat.

Put meat into a greased oven pan and roast at 250°C for about 90 minutes, or until a meat thermometer inserted into the steak shows 160°C. Start by roasting for 10-20 minutes, then add water to cover the bottom of the pan, to a depth of about 1 cm. Baste the meat with the cooking liquid every 15 minutes or so. Top up the water when it starts to boil down.

About 10-15 minutes before the steak is done, remove it from the oven, pour the cooking liquid into a saucepan, through a strainer. Put the steak back into the oven until a nice crust has formed. While it is in the oven, make the sauce:

Skim the fat off the surface of the cooking liquid. Heat in the saucepan. Make a thin, smooth paste from a couple of tbs. of flour and a bit of cold water. When the cooking liquid boils, stir the flour paste into the boiling liquid, stirring with a beater. Pour slowly and when you feel the liquid starting to thicken, stop pouring. Gently simmer the sauce for a couple of minutes, to remove the raw flour taste. Adjust the flavour with salt and pepper, and if you use it, add a little sauce colouring to get a nice, brown colour.

Serve either whole or sliced, with potatoes (poached, caramelised or mashed), sauce and whatever other side dishes you like (I like redcurrant jelly, salad and peas).

Tuesday, May 11, 2010

Maximized Lemon Pound Cake


Here's a dessert B.J. really liked. It is a pound cake, yes, but it is made with coconut flour rather than conventional or AP flour, so it is completely guilt free for people (like me) who are doing their best to remain true to the Advanced Nutrition Plan.
Enjoy.


Ingredients:
· 5 eggs
· Approximately ½ to 1 teaspoon liquid stevia (sweeten to your taste)
· 1/2 teaspoon pure vanilla extract
· 3/4 cup organic whole milk yogurt
· 2/3 cup freshly squeezed lemon juice
· zest of 1 lemon
· 1/2 cup (1 stick) organic butter, melted
· 2 teaspoons aluminum free baking powder
· 1/4 teaspoon kosher or sea salt
· 1 cup organic coconut flour, sifted (this is available at bulk food stores)

Preparation:
Preheat oven to 350 degrees F. Grease a 9x5-inch loaf pan with coconut oil, and flour with coconut flour. If using anything but a glass loaf pan, line the bottom of the pan with parchment paper. Grease the parchment with coconut oil, and flour using coconut flour.

In a large bowl beat the eggs with an electric mixer. If you have a KitchenAide stand mixer, all the better. Next add the stevia, vanilla, yogurt, lemon juice and zest. Mix until combined. Taste, and adjust sweetness by adding more stevia if you prefer. Add the melted butter in a constant stream, mixing continuously.
Sift together all of the dry ingredients. Using a spoon or spatula fold in the dry ingredients to the wet. The mixture will thicken up right before your eyes once you have added the coconut flour and other dry ingredients.

Bake for 45 to 55 minutes (I was closer to 55 minutes), until a toothpick inserted in the center of cake comes out clean. Let cake cool for 5 to 10 minutes in the pan. Invert on a cooling rack and let cool completely……if you can wait that long. On Mother's Day, we served this topped with stevia sweetened raspberry frozen yogurt. Not bad, eh?

Monday, May 10, 2010

Storing Fresh Herbs

Once the weather begins to brighten, planting herbs becomes a top priority for me. I have found in the past that herbs are not as fragile as annuals, so frost is much less of a concern (with the exception of basil, which really loves the hottest weather it can get). I am experimenting with some new herbs and vegetables this summer, all planted in containers (city mouse that I am), and all chosen because I know I will actually use them in my meals. I got some beautiful lettuce plants from McSmith’s farm a couple of weeks ago, and they are also doing beautifully.

Over the rainy Mother’s Day weekend, I happened upon the following advice about storing fresh herbs once they are picked, and decided to pass it along. This method will work whether you plant and harvest your own herbs, or you buy them in bunches at the market. Fresh parsley, cilantro, basil, and other fresh herbs can last up to 2 weeks or longer when stored this way.
Let me know how it works for you.
Enjoy.

METHOD:
1 Snip off the bottom of the stems.
2 Make sure the leaves are completely dry. Better to hold off rinsing them until you're about to use them.
3 Fill a jar or a water glass partially with water and place the stem ends of the herbs into the water in the jar. (See the photo above.)
4 If you are storing the herbs in the refrigerator, cover loosely with a plastic bag. Cilantro loves cool temperatures and should be stored in the refrigerator. Parsley can be stored at room temperature or in the refrigerator. According to experts, basil is ideally stored at room temperature and not in the refrigerator, because it is susceptible to damage from cold.
5 Change the water after several days if the water starts to discolor.

Saturday, May 1, 2010

Twice-baked buns - Tvíbökur

Twice-baked bread keeps well and is good in all kinds of sweetened soups, like Sweet Soup, Crowberry Soup, and Cocoa Soup.

250 g flour OR

100 g bread or all-purpose flour and 100 g whole-wheat flour

t tsp baking powder
1 tbs sugar
1/2 tsp ground cardamom
75 g butter or margarine
100-150 ml milk

Sift together the flour, baking powder and cardamom and add the sugar. Add the softened butter or margarine and rub into the dry mix until the mixture is crumbly. Add the milk, no more than needed to make the dough stick together. Knead until smooth and roll up into sausage shapes. Cut into even-sized pieces and roll into balls. Arrange on a greased cookie sheet and bake at 180°C until light brown.

Remove the buns from the oven and cool until they can be handled, then cut in half, put back on the cookie sheet and dry in the oven at a low temperature.

Serve with the above-mentioned sweet soups or with coffee.